Introduction
Thanksgiving is not just a time for family feasts; it's also an opportunity to express your creativity in the kitchen. Cakes have become a centerpiece, inviting you to experiment with colors, shapes, and flavors. This festive season, let's explore some delightful decorating ideas that spark joy and enhance the celebratory spirit of your gatherings.
From elegant autumn hues to playful designs, your cake can reflect the warmth and gratitude of Thanksgiving. Whether you're an experienced baker or a novice, these decorating ideas will inspire you to create a masterpiece that will be the highlight of your holiday table. Let's dive into the ingredients and techniques that will bring your Thanksgiving cake vision to life.
Ingredients
- 3 cups all-purpose flour
This is the main structure of your cake, providing the necessary framework for texture and stability. A good flour helps achieve a moist yet fluffy cake that stands up to decorations. - 2 cups granulated sugar
Sugar not only sweetens the cake but also helps create a tender crumb through its interaction with the flour and fat. It contributes to the cake's overall moisture and enhances its flavor. - 1 cup unsalted butter, softened
Butter adds richness and flavor to your cake. When creamed with sugar, it incorporates air, helping to create a light and fluffy texture that makes your cake delightful. - 5 large eggs
Eggs are essential for binding the cake ingredients together while adding moisture and richness. They also help in leavening, contributing to the cake's rise during baking. - 1 cup buttermilk
The acidity of buttermilk reacts with baking soda for leavening and adds a subtle tang to the flavor. It keeps the cake moist and improves the overall texture. - 2 teaspoons vanilla extract
Vanilla enhances the overall flavor profile of your cake, adding warmth and depth. It is essential for complementing the sweetness of other ingredients. - 1 tablespoon baking powder
This leavening agent is crucial for helping your cake rise properly, leading to a light and airy texture. It reacts with the moisture in the batter to create carbon dioxide bubbles. - 1 teaspoon salt
Salt balances the sweetness of the cake and enhances its overall flavor. It also strengthens the cake's structure. - Fondant and buttercream for decorative elements
These mediums are essential for creating beautiful decorations. Fondant allows for intricate designs, while buttercream is perfect for a classic look and easy application. - Edible decorations like nuts, fruits, or edible glitter
These elements add visual appeal and textural contrast. They are vital for personalizing your cake and making it festive and inviting.
Directions & Preparation
Step 1: Preheat your oven to 350°F (175°C).
Preheating is a crucial step that ensures even baking. If the oven isn't hot enough when the batter goes in, it can lead to unpredictable texture and rise. Give your oven at least 15-20 minutes to reach the desired temperature.
Step 2: Grease and flour your cake pans.
Properly preparing your pans prevents the cake from sticking, ensuring a clean release once baked. Use a pastry brush to apply butter or shortening, followed by a sprinkle of flour, shaking off the excess before adding the batter.
Step 3: In a large bowl, cream the butter and sugar together until light and fluffy.
This step is crucial for incorporating air into the batter. Creaming creates tiny bubbles, contributing to the cake's rise and light texture. Use an electric mixer on medium speed for about 4-5 minutes.
Step 4: Add eggs one at a time, mixing well after each addition.
Incorporating eggs gradually helps maintain the emulsion, ensuring that your batter remains smooth and flowing. This process also adds richness and contributes to building the structure of your cake.
Step 5: Mix in the vanilla extract and buttermilk until well combined.
Adding both ingredients at this stage allows for a more even distribution of flavor and moisture within the batter. The vanilla enhances the overall taste, while buttermilk provides tenderness.
Step 6: In another bowl, whisk together the flour, baking powder, and salt.
Separately mixing dry ingredients ensures they are evenly distributed within the batter, preventing pockets of baking powder or salt. This step prepares your batter for consistent rising throughout the baking process.
Step 7: Gradually add the dry ingredients to the wet ingredients, mixing until just combined.
Be careful not to overmix as this can develop gluten, leading to a dense cake. Stop mixing once you see a few flour streaks for a tender crumb.
Step 8: Divide the batter evenly between your prepared cake pans.
Evenly distributing the batter ensures uniform baking and consistent sizes for your layers. Use a kitchen scale for precise measurements or a spatula to smooth the top.
Step 9: Bake in the preheated oven for 25-30 minutes or until a toothpick inserted comes out clean.
Checking for doneness with a toothpick is a reliable method; if it comes out with a few moist crumbs, that's ideal. Avoid opening the oven door too early to maintain an even baking temperature.
Step 10: Allow the cakes to cool in their pans for 10 minutes, then transfer to a wire rack to cool completely.
Cooling in the pan helps the cake firm up to ease removal without breaking. Transferring to a wire rack prevents the bottom from becoming soggy and allows for even cooling.
Step 11: Prepare your decorating elements, such as buttercream and fondant.
Make sure your buttercream is at spreading consistency, and knead your fondant until smooth. This preparation ensures a pleasant decorating experience and makes your designs easier to achieve.
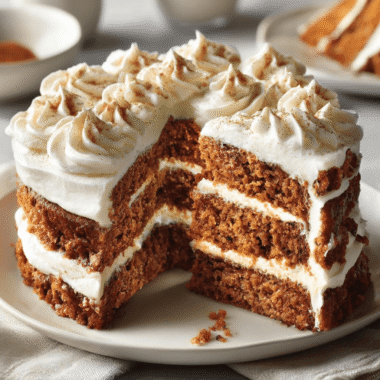
Step 12: Layer and frost your cakes, then decorate as desired.
Stacking and frosting the cakes is the foundation of your design. Use offsets and spatulas to create smooth surfaces, and be innovative with decorations like edible glitter, fruits, or seasonal elements.
Step 13: Let the decorated cake set before serving.
Allowing the cake to set helps the decorations adhere properly and improves the overall presentation. A set cake also allows flavors to meld wonderfully, creating a delicious welcome for your guests.

Festive Buttercream Techniques
Buttercream provides versatility and ease for cake decorating, allowing you to create everything from smooth sides to intricate flowers. Consider using different piping tips to achieve various textures. Using a palette knife can also create a stunning painted effect. The key to a perfect buttercream is finding the right consistency—avoid over-whipping to keep it from becoming too airy.
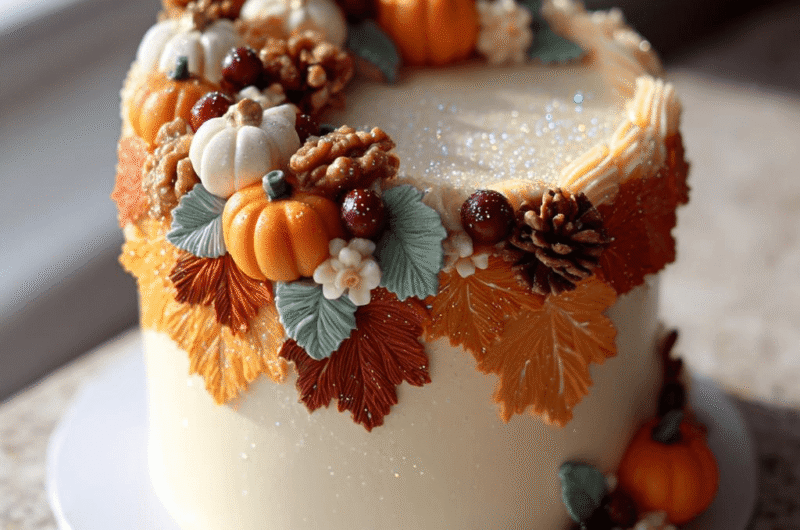
Embracing Autumn Colors with Fondant
Fondant is an excellent medium for creating festive decorations fitting for Thanksgiving. Roll out fondant into leaves, pumpkins, or even turkeys for a playful touch. Add color with gel food coloring to create vibrant designs that pop against the cake's backdrop. Don’t forget to use cornstarch or powdered sugar to prevent sticking while you're working with this pliable material.
Highlighting Seasonal Flavors
Incorporating seasonal elements like pecans, cranberries, or pumpkin spice enhances both flavor and decoration. Consider using edible flowers or fresh fruits like oranges and pomegranates to create a vibrant, natural display. Topping your cake with a layer of spiced whipped cream or caramel drizzle elevates the overall look and adds delicious flavors that scream Thanksgiving.
FAQs
Can I use a different type of flour?
Using cake flour will make the cake softer and lighter, while whole wheat flour will add a nutty flavor and denser texture. Adjust liquids as necessary to accommodate.
What should I do if my buttercream is too thin?
If your buttercream is too thin, gradually add more powdered sugar while mixing until it reaches the desired consistency. Ensure all ingredients are at room temperature for the best results.
How can I achieve a marbled effect with fondant?
To create a marbled effect, take two or more colors of fondant, twist and fold them together gently without over-kneading. Roll it out for a beautiful, swirled appearance.
What can I do if my cake layers dome while baking?
Dome-shaped layers occur due to the oven's temperature being too high. To fix this, try lowering the oven temperature slightly and baking for longer to achieve even baking.
Is it possible to substitute eggs in this recipe?
Yes, you can use flaxseed meal or applesauce as egg substitutes—1/4 cup of applesauce or 1 tablespoon of flaxseed meal mixed with 2.5 tablespoons of water for each egg.
What if my cake is overbaked?
If your cake is overbaked, it may be dry. Consider serving it with a rich frosting or incorporating it into a trifle with layers of moistened cake and creamy filling.
How should I layer my cake for stability?
To ensure stability, use a level cake layer trimming off the dome. Frost between layers using a crumb coat to seal in the crumbs and give your design a clean finish.
Can I create 3D decorations with fondant?
Absolutely! Roll and shape fondant into 3D items like pumpkins or leaves. Use a small amount of water or edible glue to adhere pieces together or to the cake.
Conclusion
Creating a Thanksgiving cake that captures the spirit of the season is a rewarding endeavor that brings joy to both the baker and the guests. With a variety of decorating techniques and ideas at your fingertips, you can let your creativity soar while crafting an edible centerpiece for your gathering.
As you embark on your cake decorating journey, remember that the true essence of these creations lies in the love and thoughtfulness put into them. Embrace this festive season with open arms, and let your culinary creations reflect the gratitude and warmth that Thanksgiving represents.
Recipe Card
Notes
Additional serving suggestions: pair with a crisp salad, garlic bread, or roasted seasonal vegetables for balance.
For make-ahead, prep components separately and assemble just before heating to preserve texture.
Taste and adjust with acid (lemon/vinegar) and salt right at the end to wake up flavors.