Introduction
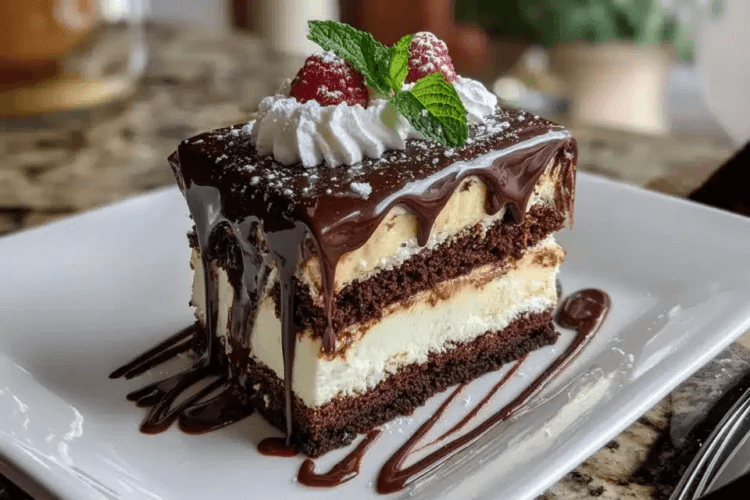
The Tuxedo Bar Cake encapsulates the essence of indulgence and nostalgia, often making an appearance at family gatherings and celebrations. This two-layer cake, with its rich chocolate and cream cheese components, reminds many of cherished moments spent around the dining table.
Its elegant presentation, resembling the classic tuxedo, allows it to serve as both a dessert and a centerpiece. The contrasting colors and textures draw the eye, while the taste delights the palate, making every slice an experience worth savoring.
Ingredients
- 1 ½ cups all-purpose flour
All-purpose flour provides the structure needed for the cake and contributes to its soft texture. When combined with the other ingredients, it creates a balanced crumb that holds the moist layers together. - 1 cup granulated sugar
Granulated sugar not only sweetens the cake but also helps with browning during baking. It plays a vital role in the cake's overall texture, contributing to a tender crumb when properly creamed with butter. - ½ cup unsweetened cocoa powder
Cocoa powder imparts a rich chocolate flavor that is essential to the Tuxedo Cake's identity. It also adds moisture and helps achieve the desired deep color, enhancing the visual appeal of the dessert. - 1 tsp baking powder
Baking powder is a leavening agent that creates air pockets in the cake as it bakes, resulting in a light and fluffy texture. Using the right amount ensures that the cake rises properly without collapsing. - ½ tsp baking soda
Baking soda works in tandem with the baking powder to achieve the perfect rise. It also aids in browning and can enhance the overall flavor profile, especially when paired with acidic ingredients. - ½ tsp salt
Salt enhances the flavors within the cake, balancing the sweetness and bringing forth the chocolate notes. It's essential to highlight the complexity of flavors without overwhelming the palate. - 3 large eggs
Eggs act as binders in the cake, providing structure while also lending moisture. The emulsification properties of eggs help create a well-mixed batter, ensuring even texture throughout. - 1 cup buttermilk
Buttermilk adds a lovely tang to the cake and helps keep it moist. The acidity reacts with the baking soda, contributing to leavening, and resulting in a tender crumb. - ½ cup vegetable oil
Oil keeps the cake moist and provides a softer texture than butter. It also enhances the cake's ability to stay fresh longer after baking. - 1 tsp vanilla extract
Vanilla extract adds a warm, aromatic flavor that enhances the overall taste. It complements the chocolate beautifully, providing a layered depth of flavor. - 8 oz cream cheese, softened
Cream cheese is key to the frosting, giving it a rich and decadent texture. It incorporates well and allows for a smooth spread over the cake, creating a luscious topping. - 3 cups powdered sugar
Powdered sugar sweetens the cream cheese frosting while ensuring that it remains fluffy and easy to spread. Its fine texture allows for a smooth consistency in the finished frosting. - ¼ cup heavy cream
Heavy cream adds richness to the frosting, improving its spreadability and texture. Additionally, it helps achieve a desired stability, especially when the cake is layered. - 1 cup chocolate ganache (for drizzling)
Chocolate ganache provides a beautiful, glossy finish and enhances the chocolate flavor. Its rich texture adds a luxurious element to the presentation and taste.
Directions & Preparation
Step 1: Preheat your oven to 350°F (175°C).
Preheating the oven is crucial for ensuring an even bake. A hot oven helps the cake rise properly right from the start, setting the structure and texture. Always check with an oven thermometer if you're unsure about your oven’s calibration.
Step 2: Grease and flour two 9-inch round cake pans.
Greasing and flouring the pans prevents the cake from sticking, making it easier to remove once baked. You can use parchment paper at the bottom for added assurance; this helps maintain the shape and prevents damage when transferring the cakes.
Step 3: In a medium bowl, whisk together the flour, cocoa powder, baking powder, baking soda, and salt.
Whisking the dry ingredients together helps evenly distribute the leavening agents and salt throughout the flour. This ensures that your cake rises consistently, avoiding any clumps or uneven rising that could occur.
Step 4: In a large bowl, cream together the granulated sugar and vegetable oil until well combined.
This creaming process causes the sugar to dissolve partially, introducing air into the mixture. This step ensures a lighter, fluffier cake, setting a foundation of texture for the layers to come.
Step 5: Add the eggs, one at a time, mixing well after each addition, then stir in the vanilla extract.
Incorporating the eggs one at a time allows for better emulsification, helping to create a uniform batter. This careful mixing ensures that each egg contributes to the moisture and structure of the cake.
Step 6: Alternate adding the dry mixture and buttermilk to the creamed mixture, mixing until just combined.
This method prevents overmixing, which can lead to a tough cake. By alternating, you can maintain the batter's balance of moisture and structure without compromising the texture.
Step 7: Divide the batter evenly between the prepared cake pans and smooth the tops.
Even distribution of the batter ensures that both layers bake uniformly, avoiding doming or uneven tops. Smoothing the tops helps in achieving a consistent finish when layers are stacked.
Step 8: Bake in the preheated oven for 25-30 minutes, or until a toothpick inserted into the center comes out clean.
Baking times can vary, so checking with a toothpick is ideal. This step ensures that the cakes are fully cooked without drying out; keep a close eye as ovens can differ in temperature.
Step 9: Allow the cakes to cool in the pans for 10 minutes, then turn them onto wire racks to cool completely.
Cooling in the pans helps prevent the cakes from breaking apart. Moving them to wire racks allows for adequate airflow, ensuring that they cool down quickly while maintaining moisture.
Step 10: Prepare the cream cheese frosting by beating softened cream cheese and powdered sugar together until fluffy, then add heavy cream.
Beating the cream cheese until fluffy integrates air, making for a lighter frosting. Adding heavy cream at the end provides extra richness and improves the consistency for spreading.
Step 11: Once the cakes are completely cooled, place one layer on a serving plate and spread a thick layer of frosting on top.
Frosting the first layer evenly ensures every bite is delicious, establishing a balance of flavors. Use a spatula for an even spread to enhance the overall presentation of the cake.
Step 12: Place the second layer on top and frost the top and sides of the cake with the remaining frosting.
Covering the entire cake creates a beautiful presentation and ensures that the flavors meld beautifully. It’s an opportunity to showcase your skills; smooth out the sides for a clean finish or use a spatula to create texture.
Step 13: Drizzle the chocolate ganache over the top for decoration and added flavor.
The ganache elevates the cake's appearance and taste, tying together the chocolate elements and providing a luxurious touch. Drizzling should be done just before serving for an appealing, fresh look.
Step 14: Slice and serve the cake at room temperature, enjoying the layered decadence and nostalgia.
Serving at room temperature enhances the flavors and textures, making every bite delightful. This step not only allows the cake to showcase its layers but also brings out the richness of both the chocolate and cream cheese.

The Perfect Ganache: Secrets Unveiled
Creating a glossy, indulgent ganache is an art that can elevate any cake, including the Tuxedo Bar Cake. Start with a good quality chocolate and the right cream ratio; typically, a 1:1 ratio works beautifully. Heat the cream gently before pouring it over the chopped chocolate, allowing it to melt slowly for a silky finish.
Layering Like a Pro
The way you layer your cake can make a significant difference in texture and taste. When stacking, ensure each layer is level and ideally chilled to prevent sliding. Adding a small dollop of frosting between layers can help secure them and keep the cake from toppling, ensuring a delightful presentation.
Nostalgia On a Plate: Creating Memories
Baking can often evoke nostalgic feelings, tying flavors to memories and emotions. The Tuxedo Bar Cake, with its rich layers and playful elegance, is perfect for celebrating milestones. Sharing this cake with loved ones can create new memories, wrapping you in the warmth of nostalgia with every slice.
FAQs
What happens if my batter is too thick?
If the batter is too thick, consider adding a tablespoon or two of buttermilk or water to achieve a pourable consistency. Make sure to mix gently to avoid overworking the batter.
How can I make the frosting less sweet?
To reduce the sweetness of the frosting, consider decreasing the powdered sugar or adding a pinch of salt. Alternatively, incorporate a bit more cream cheese to balance the flavors.
What do I do if my cake layers are uneven?
If your cake layers turn out uneven, use a serrated knife to level them before frosting. This not only improves the appearance but also ensures that the layers stack neatly.
Can I use a different frosting style for this cake?
Absolutely! While cream cheese frosting is traditional, you can substitute with a whipped chocolate ganache or a buttercream for a different flavor profile. Just ensure the consistency is suitable for spreading.
Is there an alternative to buttermilk if I run out?
If you're out of buttermilk, you can easily make a substitute using milk and vinegar or lemon juice. For each cup of buttermilk needed, combine 1 cup of milk with 1 tablespoon of vinegar or lemon juice and let it sit for about 5 minutes.
Can I adjust the size of the recipe for different pan sizes?
Yes, you can scale the recipe up or down depending on the desired cake size. Just keep an eye on baking times, as smaller layers will bake faster, while larger ones may require additional time.
Conclusion
The Tuxedo Bar Cake is more than a dessert; it's a celebration of flavor and a nod to cherished memories. Its layers of decadence invite everyone to indulge and reminisce, making gatherings even more special.
By mastering this cake, you not only create a stunning centerpiece but also forge new memories around the table, ensuring that this decadent slice of nostalgia will be loved for years to come.
Recipe Card
Notes
Additional serving suggestions: pair with a crisp salad, garlic bread, or roasted seasonal vegetables for balance.
For make-ahead, prep components separately and assemble just before heating to preserve texture.
Taste and adjust with acid (lemon/vinegar) and salt right at the end to wake up flavors.


