Introduction
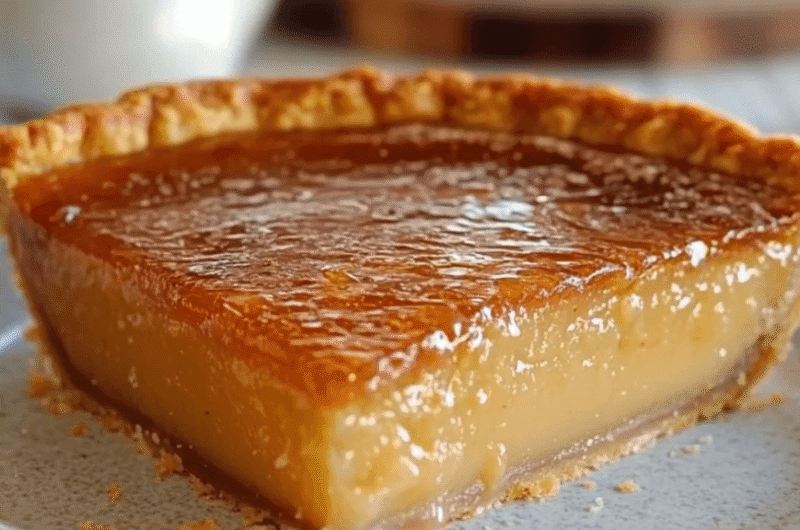
Salted Honey Pie is a delightful dessert that perfectly balances the sweetness of honey with a touch of saltiness, resulting in a flavor that lingers long after the last bite. This pie is not just a treat but an experience, inviting home cooks to bring together rich ingredients in harmony.
If you're looking for a dessert that impresses without overwhelming your time in the kitchen, Salted Honey Pie fits the bill beautifully. Its simplicity in preparation belies the depth of flavor in every slice, making it an ideal addition to any gathering, from casual dinners to festive celebrations.
Ingredients
- 1 ½ cups all-purpose flour
Flour forms the base of the crust, providing structure. It ensures a flaky texture when combined with fats, making the crust sturdy enough to hold the filling. - ½ cup unsalted butter, cold and cubed
Butter adds richness and flavor to the crust. The cold temperature helps create a flaky texture, while its fat content lends a tender mouthfeel. - ¼ teaspoon salt
Salt enhances the overall flavor of the pie. In baking, it helps to balance the sweetness of honey, bringing out the other flavors in the filling. - 3 tablespoons ice water
Ice water is crucial for bringing the dough together without warming it up. It helps maintain the cold temperature of the butter, essential for a flaky crust. - 1 cup honey
Honey serves as the star ingredient, providing natural sweetness and a distinct flavor that defines the pie. Its thickness helps to set the filling as it bakes. - 3 large eggs
Eggs act as a binding agent in the filling, giving it structure and richness. They contribute to the custard-like texture that contrasts beautifully with the crust. - 2 tablespoons all-purpose flour
Adding a small amount of flour helps thicken the filling and maintain its integrity as it sets, giving the pie a pleasing consistency. - ½ teaspoon flaky sea salt
A sprinkle of flaky sea salt on top enhances the sweetness of the honey and adds a crunchy texture, creating a perfect balance between sweet and savory.
Directions & Preparation
Step 1: Prepare the pie crust.
Begin by mixing the flour and salt in a large bowl. Add the cold, cubed butter and use a pastry cutter or your fingers to incorporate until the mixture resembles coarse crumbs. This step is critical, as it ensures the butter does not melt until baking, allowing for a flaky texture.
Step 2: Add ice water and form the dough.
Gradually add the ice water, one tablespoon at a time, mixing until the dough just comes together. Over-mixing can lead to a tough crust, so stop as soon as the dough holds together. Wrap it in plastic wrap and refrigerate for at least 30 minutes to relax the gluten, making it easier to roll out.
Step 3: Roll out the dough.
On a floured surface, roll out the chilled dough into a circle about 12 inches in diameter. This step ensures an even, thin base that fits your pie dish perfectly. Aim for an even thickness to avoid uneven baking, which can lead to an overcooked or undercooked crust.
Step 4: Transfer the dough to the pie dish.
Carefully place the rolled dough into your pie dish, pressing it gently into the corners. This is important for preventing gaps where the filling can leak. Trim any excess dough hanging over the edges, and dock the bottom with a fork to prevent bubbling during baking.
Step 5: Blind bake the crust.
Preheat your oven to 350°F (175°C) and blind bake the crust for about 15-20 minutes, until lightly golden. This step minimizes sogginess by pre-cooking the crust, giving it a head start before adding the filling. Be sure to use pie weights or dried beans to keep the crust flat.
Step 6: Make the filling.
In a medium bowl, whisk together the honey, eggs, and flour until smooth. This mixture is the foundation of your pie, with the honey providing sweetness and the eggs ensuring a custardy texture. Be careful not to overmix, as incorporated air can lead to cracks during baking.
Step 7: Fill the pie crust.
Pour the honey filling into the pre-baked crust, smoothing it out with a spatula. This is the moment to ensure an even layer, as this will impact how well it sets. The filling will puff slightly during baking, so fill just below the crust edge.
Step 8: Bake the pie.
Return the pie to the oven and bake for 25-30 minutes. The filling should be set but still slightly wobbly in the center. Underbaking slightly is key, as it will continue to set while cooling. Keep an eye on the crust to prevent over-browning.
Step 9: Cool and serve.
Allow the pie to cool at room temperature for at least an hour before slicing. This cooling time helps the filling firm up and makes for cleaner slices. Serve with a sprinkle of flaky sea salt for a finishing touch that enhances the flavors beautifully.

Experimenting with Honey Varieties
The choice of honey can dramatically affect your Salted Honey Pie. From wildflower honey to clover, each variety brings its unique flavor profile. Explore local or artisanal options, or even infuse your honey with herbs like lavender for a sophisticated twist. This experimentation can lead to a personal signature pie that reflects your taste.
Enhancing Texture through Toppings
Consider adding a decorative topping to your pie for both aesthetics and texture. Whipped cream atop each slice adds a light, airy contrast to the rich filling. Alternatively, a sprinkle of crushed nuts introduces crunch, making every bite more dynamic. Playing with texture enhances the enjoyment of this dessert.
The Perfect Pairings
Pairing Salted Honey Pie with the right beverage can elevate your dessert experience. A cup of freshly brewed espresso or a delicate herbal tea complements the honey's sweetness while cleansing the palate. For a festive touch, consider a dessert wine like Sauternes, which harmonizes beautifully with the flavors in the pie.
FAQs
What can I do if my filling is too runny?
If your filling is too runny, it may need more flour to thicken. You can gently reheat the pie to allow the filling to set more as it cools.
Can I make this pie dairy-free?
Yes, you can substitute the butter in the crust with a dairy-free alternative like coconut oil or a vegan butter substitute.
What if my crust shrinks during baking?
If your crust shrinks, it may be due to overworking the dough. Next time, make sure to handle the dough gently and allow adequate resting time.
Can I scale the recipe for a larger crowd?
Certainly! To scale the recipe, simply double the ingredients for a larger pie or prepare multiple smaller pies to serve more guests.
What if my pie crust is too thick?
If the crust ends up too thick, it can result in a chewy texture. Next time, aim for an even 1/8-inch thickness when rolling it out.
Why did my filling crack on top?
Cracks can occur if the filling is overbaked or baked at too high a temperature. Maintain a gentle bake for better results.
Conclusion
Salted Honey Pie is a testament to the beauty of simple ingredients working in harmony. Each slice is a reminder of the pleasure found in homemade desserts, showcasing the balance of sweet and salty that delights the palate.
As you enjoy this pie, remember the joy of cooking and the creativity it allows. This recipe not only brings a delicious dessert to your table but also offers an opportunity for exploration and personal touches.
Recipe Card
Notes
Additional serving suggestions: pair with a crisp salad, garlic bread, or roasted seasonal vegetables for balance.
For make-ahead, prep components separately and assemble just before heating to preserve texture.
Taste and adjust with acid (lemon/vinegar) and salt right at the end to wake up flavors.